On Wednesday the 26th, I went to the cinema to see Mockingjay Part One. Throughout the first and second movie, Katniss Everdeen wore some gorgeous braided hairstyles. I was inspired to create this braided hairstyle on my little sister Róisín. I hope that you can learn how to do this braid from this blog post. I tried to make both the pictures and instructions as easy to understand as possible! It's definitely difficult to teach a hairstyle through pics!
Let's get into the tutorial!!
Dutch braids have the same method as French Braids. For a French Braid, you braid over the middle section. For a Dutch Braid, you braid under the middle section. You continue this method for the whole braid.
Step One : Brush hair to remove any knots or tangles.
This step is pretty straight forward. Brushing your hair allows you to braid the hair a lot easier. For this step, I used a Tangle Teezer Inspired Brush that I picked up in Wispys, Ballina for a TINY €2!! I found these in Heatons, Ballina also. These are excellent brushes! They work wonders! I would definitely give these a try before you splurge around €15 on a Tangle Teezer.
Step Two : Seperate your Fringe from the rest of your hair.
Katniss usually wore her fringe down and didn't braid it. Leaving your fringe out of the braid, frames your face. It gives the braid a casual and effortless look. If it's easier for you, use a hair tie or clip to hold the fringe away from the rest of your hair.
Step Three : Take a section of hair and seperate into three pieces.
Now you are going to take a piece of hair and divide into three pieces. Where you choose to take the section of hair will help the direction you will braid. If you want a vertical dutch braid, take the piece of hair at the very middle of your head. If you wish to create a diaganol dutch braid, take a section of hair from the side of your face. I took hair from the right side of Róisín's head. Katniss usually wore a braid that begun on the same side of your fringe and finished on her opposite side.
Step Four : Begin the Braid.
This is when the instructions can get tricky and confusing. I promise I will try and explain it as easy as possible. The easiest way to explain it is to give each strand a letter; A, B & C. The strand on the left will be called A. The strand in the middle will always be called B. The strand on the right will be called C. A & C are always the two outer strands. B is always the middle strand.
I usually start with the right strand C. To begin the braid, take C. and bring it into the centre by pulling it underneath B. It can be seen in Step 2 & 3 in the photo. Now, C. has been changed to B. and B. has been changed to C. because they have swapped places. To ensure you get a Dutch Braid, make sure you ALWAYS tuck the piece UNDERNEATH the middle strand.
Now you are going to repeat that step with the A strand. Bring the A strand to the middle by tucking it below the middle strand B. It can be seen in Step 4.
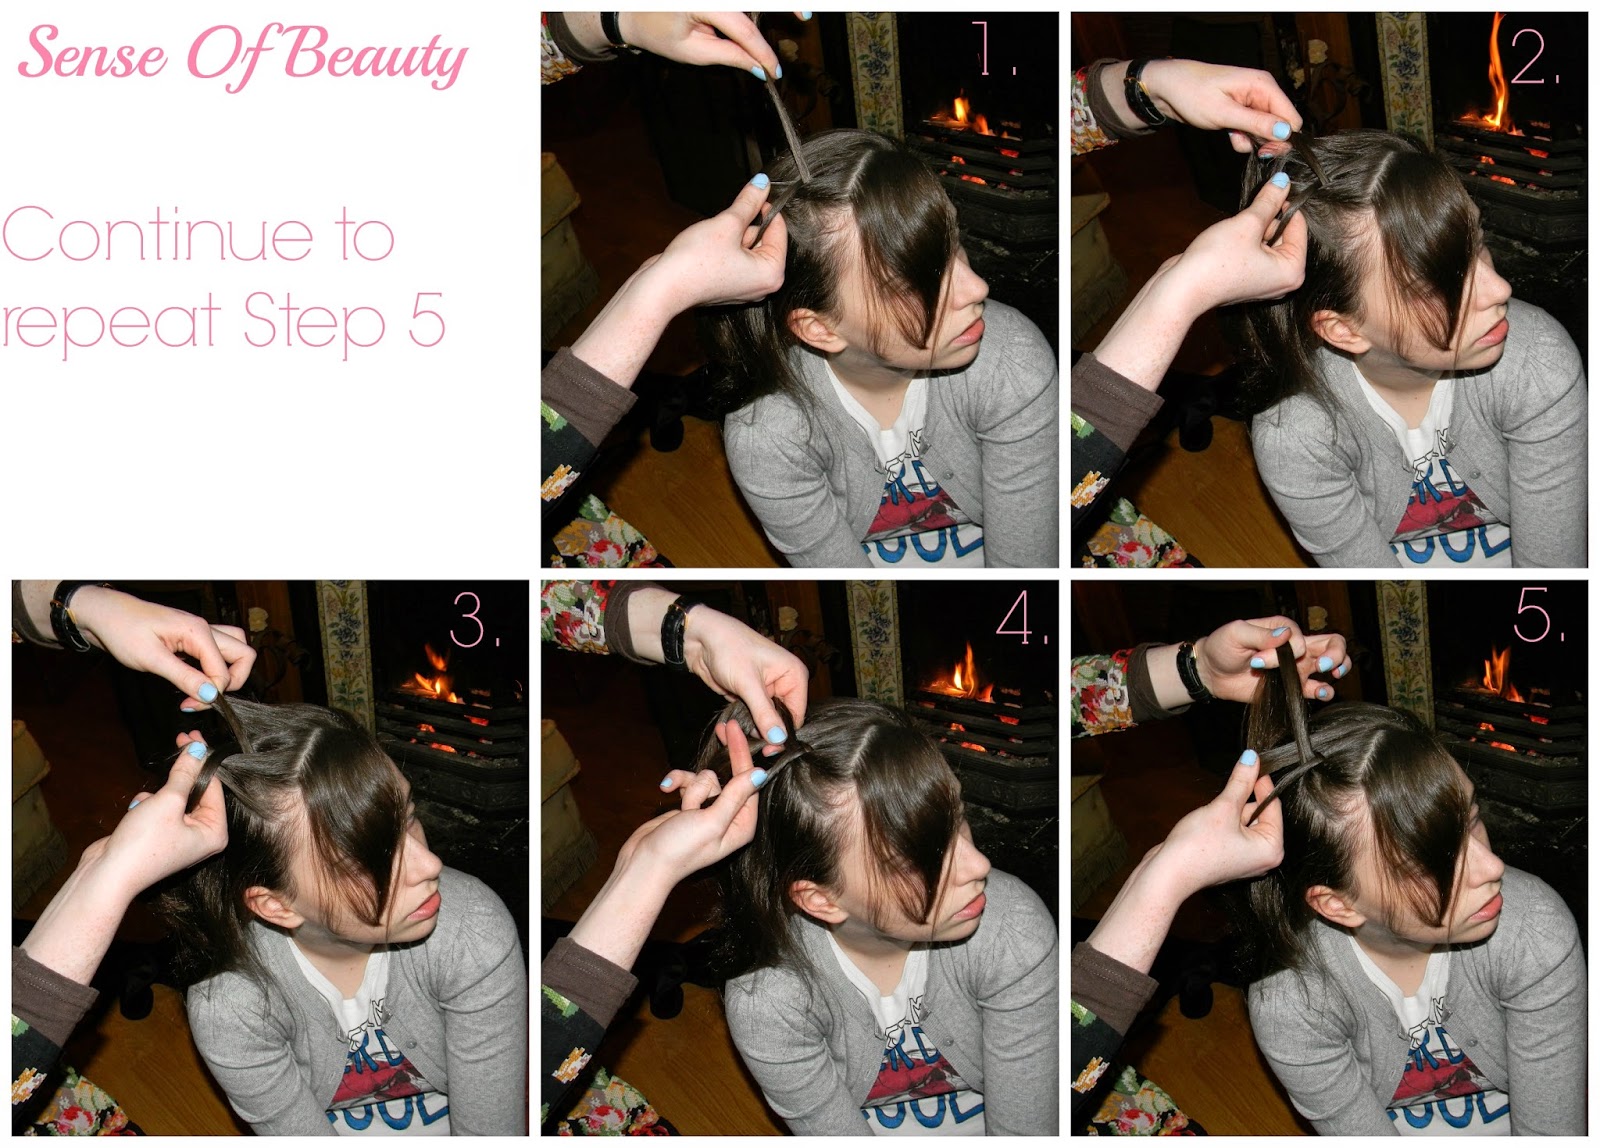
Step Five : Begin adding Hair.
Step Five is when it all begins to get even more difficult! For Step 5, you begin to add hair to your braid. In Step Four, we brought A & C into the middle by pulling it underneath the B strand. You will want to continue this method of having 3 strands; A, B & C. Before pulling C underneath B to the centre, you are going to add a small section of hair that is beside C to section C. Once this is added you will then pull this under B into the middle.
Next, you are going to add a piece of hair to your A strand. Then, pull strand A under B to become the new middle.
Basically, these pics are using the same method as Step Four : Begin the braid. I recommend that one of the easiest ways to understand how to do a dutch braid is to use the A, B & C process.
Begin with A (left strand), B (middle strand) and C (right strand).
Add piece of hair to C (right strand). Pull C strand (right strand) underneath B (middle strand). Now C strand is in the middle and the B strand is on the right where C used to be.
Add a piece of hair to A (left strand). Pull A strand (left strand) underneath B (middle strand - was C but now will be called B because it is in the middle). Now A strand is in the middle and B strand (old C) is on the left where A used to be.
Always call the left strand A. The middle strand B. The left strand C.
In this pic, I am still continuing on with Step 5. I am staying with my A, B & C system. Adding pieces of hair to the A & C strands and crossing them underneath the B strand.
In Step 4 , you can see the Dutch Braid close up.
The larger the sections you add to the A & C strands, the braid will look more casual, messy and will take less time to complete. The smaller the sections you add to the A & C strands, the braid will appear structured and will take more time.
When you cannot add any more hair to your A & C sections, you are going to continue the process just like you did in Step Four : Begin The Braid. You will still cross C and A under B into the middle.
When you wish to finish the braid, take a rubber elastic and tie at the end of the braid.
That's your braid finished!
I hope this blog post was helpful!
I promise I tried my hardest to explain the method as best as possible!
Here's a video montage of all pics taken when I was doing this braid!
This might help you!
Music By: Nilow ( LisaMitchell ) Neopolitan Dreams Dubstep Remix
I hope you enjoyed this blog post!
Next blog post will be posted Monday!
Thanks again!
Love,
Siobhán xo
Hello Lovlies! Welcome back to Sense Of Beauty! Tonight I went to the cinema to see Mockingjay Part One! My Little Sister Róisín and I went together and decided to post our outfits!
Here's a look at the makeup products I wore tonight! I completely forgot to get a close up pic of my makeup! No doubt I'll wear this makeup again so I'll definitely take a pic of it!
Here's a list of the make-up I wore:
-Maybelline Dream Nude Airfoam in 005 Light Beige
-Collection Lasting Perfection Concealer in 01 Fair
-Natural Collection Pressed Powder in Neutral
-Sleek Nude Collection Blush in Suede
-Carmex Lip Balm in Cherry
-Rimmel London Brow This Way Brow Gel in Medium Brown
-W7 Eyebrow Palette (Used as an Eyeshadow)
-Technic Brown Eyeliner Pencil
-Dermavio Luxurious Lashes Black Mascara - Volume & Length
-Maybelline Falsies Mascara
Here's a look at the hair products I applied!
-Got2B Beach Matt Mermaid Look Texturizing Salt Spray
-Macadamia Oil Extract Hair Treatment
Here's the outfit I wore!
-Green Scarf | Penneys
-Leather Jacket | Penneys
-Babydoll Style Dress | Swamp (ON SALE FOR ONLY €3!!)
-Black Tights | Penneys
-Suede Boots | Sara Ballina
My Little Sister Róisín didn't wear any makeup! She has gorgeous skin! Instead, I wanted to create a Katniss Everdeen Inspired Hairstyle! I created a Sideways Dutch Braid on Róisín's hair. Róisín has layers in her hair, this made pieces of hair fall out of the braid. To try and solve the problem, I used bobby pins/grips and pinned back the bits of hair.
Here's a look at Róisín's Outfit she wore tonight.
-Cardigan | Penneys
-Top | Penneys
-Blue Skinny Jeans | Penneys
-CAT Boot Inspired Boots | Penneys
I LOVED the movie! Don't worry I won't spoil anything!! The movie is brilliant! I can't fault it! The acting, special effects and makeup/costumes were brilliant! I just can't wait for the next movie! BUT there's an ENTIRE YEAR to wait!! -.-
I hope you enjoyed this blog post!
The next blog post will be posted Friday AND it's going to be an exciting one!
Thank you!
Love,
Siobhán xo
Hello Lovlies! Welcome back to Sense Of Beauty! Today's blog post will be a wishlist compiled of different items from a few different stores! Thanks for stopping by!
River Island White Platform Barely There Sandals €60
http://eu.riverisland.com/women/shoes--boots/heels/White-platform-barely-there-sandals-655839
'Barely There' Heels are a HUGE trend for 2014. They're very delicate and dainty looking. Some heels can appear bulky with outfits, these are your solution! The colour white is very versatile! White can be worn with any colour outfit! These are definitely added to my November Wishlist!
AX Paris Cut Out Side Buckle Ankle Boot £36.99
http://www.axparis.com/products/-Cut-Out-Side-Buckle-Ankle-Boot.html
I believe Tan Boots are an essential in everyone's wardrobe! The Tan colour can be easily paired with most outfits! I was so upset when I discovered they didn't have size 4 or 5 in stock! Fingers crossed they'll come back in stock soon!
AX Paris Coloured Long Sleeve Wrap Front Sequin Covered Bodycon £50
http://www.axparis.com/products/Coloured-Long-Sleeve-Wrap-Front--Sequin-Covered-Bodycon.html
With the Holiday Season approaching fast, sequined clothes are becoming a popular trend! I love this sequin dress I found on AX Paris! Swamp have a very similar dress in stock. It is €49.98 but the dress does not have the 'Wrap' feature. I would definitely check it out!
Missguided Alara Neoprene Abstract Print Playsuit €25.99
http://www.missguided.eu/catalog/product/view/id/131506/s/alara-neoprene-abstract-print-playsuit-white/category/526/
I am OBSESSED with this playsuit from Missguided! It's gorgeous! AND, it's only €26! The colours in the playsuit are lovely! Pair this playsuit with black heels and a black clutch = PERFECTION!
New Look Pure Colour Light Brown Nail Polish €3.99
http://www.newlook.com/eu/shop/parentcategory/beauty/pure-colour-light-brown-nail-polish-_325963021
There is definitely no rhyme or rhythm to this post! I am just simply posting what I find in the sequence that I find them! Right now, I am definitely loving wearing nude nails! This nude nailpolish looks like a steal for ONLY €4!
New Look Cameo Rose Tartan Check Slim Leg Trousers €22.99
http://www.newlook.com/eu/shop/womens/trousers-and-shorts/cameo-rose-tartan-check-slim-leg-trousers-_333008469
These trousers from New Look are gorgeous! I think these would be lovely with a black chiffon shirt and black boots! Love these! AND, they're only €23! Such a steal!!
Missguided Lena Cocoon Coat Cream REDUCED TO €39.00
http://www.missguided.eu/catalog/product/view/id/136566/s/lena-cocoon-coat-cream/category/503/
I am on the search for a large unfitted coat and I think I've found it! The jackets were €51.99 and are now reduced to €39.00. The colour cream can be difficult to keep clean but it can be worn with any colour!
Boohoo Beth Snowflake Cami & Printed Legging PJ Set €18
http://www.boohoo.com/new-in/beth-snowflake-cami+printed-legging-pj-set/invt/azz18203
How ADORABLE are these pj's? I LOVE them! They look super comfortable! They're reasonable for €18 too!
Boohoo Lisa Check Cape €26
http://www.boohoo.com/new-in/lisa-check-cape/invt/azz17348
Capes are a trend that I am definitely LOVING! They definitely keep you super warm and cosy! They look like a 'trendy blanket'! They're very reasonable for ONLY €26 too!
Boohoo Willow Floral Knitted Top With Contrast Woven Back €20
http://www.boohoo.com/new-in/willow-floral-knitted-top-with-contrast-woven-back/invt/azz18710
I am OBSESSED with this top! The pattern is gorgeous BUT the PRICE! This is so affordable for only €20! I love the detail on the back with the sheer material!
That's it! That's my November Wishlist! I did try to include items from different stores online but I must admit I did get a bit carried away with boohoo towards the end! I am very surprised with boohoo! I loved so many pieces and their prices are very reasonable!
ALSO, boohoo are offering 24% until Midnight tonight off their Christmas Shop! To avail of this code, use the code 'ELF' at checkout!
Thanks for stopping by!
Stay tuned for my next blog post on Wednesday 26th!
Love,
Siobhán xo
Hello Lovlies! Welcome back to Sense Of Beauty! Today's blog post is going to be a short list of my favourite lipsticks for Autumn/Winter 2014. Let's get started!!
Here's a snap of all 5 lipsticks. I included their names beside the lipstick. I ensured to include lipsticks that not only range in colour, but also range in price. These lipsticks vary from €2.99-€19.50. There is a lipstick here to match anyone's budget.
My first favourite lipstick is one from Wet'n'Wild. I included as much information on these photos of the lipsticks to make it easier for you. The shade of this lipstick is 'Sugar Plum Fairy'. I bought it in Penneys Galway, if you would like to see what else I hauled when I purchased this, check out this post:
http://senseofbeauty95.blogspot.ie/2014/10/day-trip-to-galway-ootd-motd-haul.html
I really enjoy this lipstick. The price of the lipstick makes it oh so much sweeter! I bought this lipstick for a very small €2.99! This lipstick has excellent pigmentation! The shade itself is gorgeous. It is similar to MAC's Rebel. Keep reading because I have a swatch comparison of the two. Sugar Plum Fairy is a gorgeous berry colour.
'Cherry Bomb' is another Wet'nWild favourite of mine. I purchased it in Penneys Galway for €2.99. Cherry Bomb is darker than Sugar Plum Fairy. It is a deeper berry colour. If you prefer darker lipsticks, this one is definitely for you!
I sometimes find that Wet'n'Wild lipsticks can bleed. To prevent or solve this problem, I ensure I line my lips with lipliner and then apply concealer around my lips after applying the lipstick.
The third lipstick is one from NYX. It's in the shade 'Alabama'. I bought it in Shaws Ballina for around €7.50. The pigmentation of this lipstick is excellent. It is a matte lipstick. Matte lipsticks are definitely my favourite type of lipstick. The colour is a deep rich red. It's a browny red.
My fourth favourite lipstick is 'Rebel' from MAC. This was my very first dark statement lipstick I ever purchased. The smell is gorgeous, it smells like vanilla. I bought this lipstick in Brown Thomas on Grafton Street for €19.50. It is very similar to Wet'n'Wild's Sugar Plum Fairy. It is a gorgeous berry colour.
My fifth and final favourite lipstick is another favourite from MAC. The shade is in 'Ruby Woo'. I think this is my absolute favourite lipstick out of all the previous lipsticks. It is a matte lipstick. It really is MATTE. I recommed applying a lipbalm before you wear this lippie. It is a beautiful rich red. It is the PERFECT red lipstick. Wearing this lipstick, gives the appearance of whiter teeth. This lipstick is the ULTIMATE lipstick for Christmas!
I've included swatches of all lipsticks in natural lighting and also artificial lighting (camera flash). The photo above is with artificial lighting. As you can see from the photo, all lipsticks are generously pigmented!
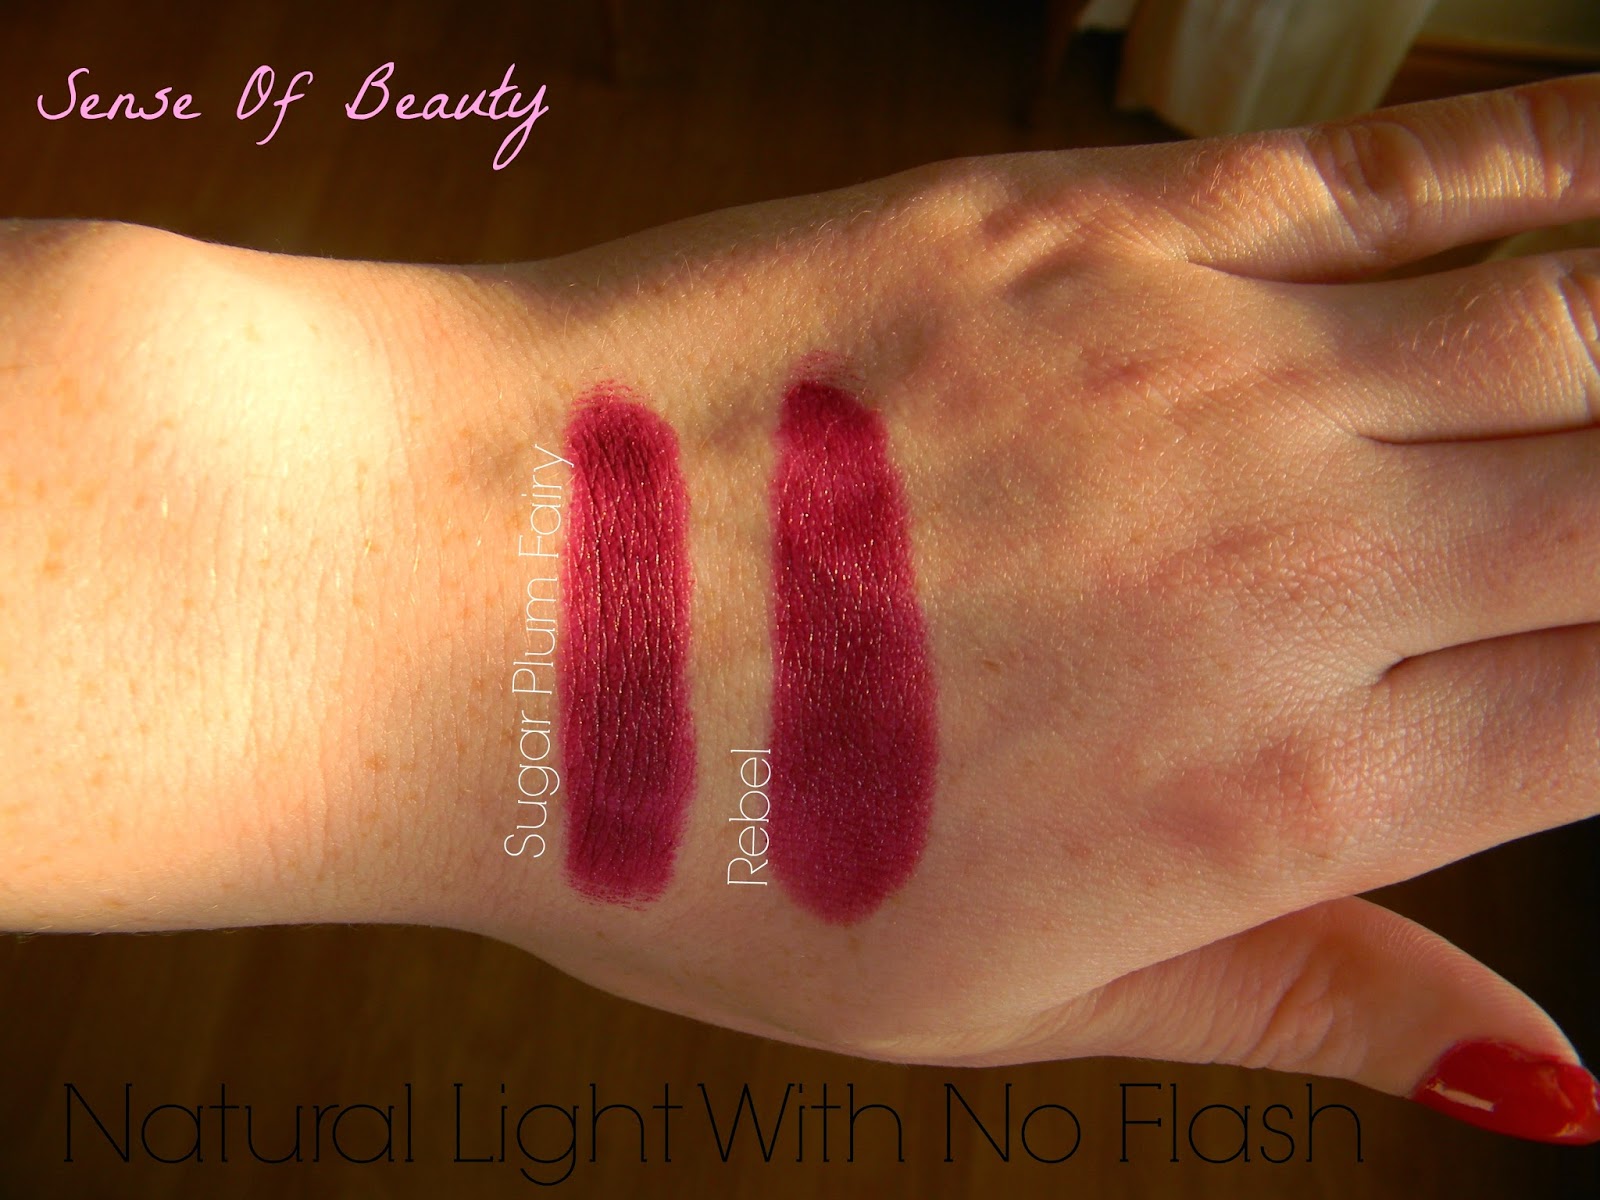
Here's the lip swatches in natural lighting with no flash. This photo allows you to see the lipsticks at their true colours.
As promised, here is the comparison of the Wet'n'Wild lippie in Sugar Plum Fairy vs. MAC's Rebel. Wet'Wild's lipstick is €2.99 and MAC'S is €19.50. This photo is with artificial lighting.
Here's the lipstick swatches in natural lighting with no flash. With €16 in the difference, looking at the swatches, there is nothing different between the two! Sugar Plum Fairy is an excellent dupe for MAC'S rebel! I would definitely recommend Sugar Plum Fairy to anyone who is on a budget and is looking for a MAC Rebel dupe.
I also wanted to include my favourite lipliner for Autumn/Winter 2014. My sister bought this for me in Germany so I can't remember how much it was, sorry! I always line the edges of my lips. Doing this creates the look of an ombré lip. You can also wear this lipliner without a lipstick or lipliner over it! It gives a matte look and lasts forever!
Here's a swatch of the lipliner with artificial lighting.
The photo above is a swatch of the lipliner in natural lighting with no flash. It is definitely a deep red/berry colour. Perfect for this Autumn and Winter.
That's them finished! I hope you enjoyed this blog post! I worked really hard on editing the pics! If you have any different lipsticks that you love please let me know! I would love to give them a try!
Thanks for stopping by!
My next blog post will be posted on Monday!
Stay tuned!
Love,
Siobhán xo


.jpg)