Hello Lovlies! Welcome back to Sense Of Beauty! For today's blogpost, I filmed a makeup tutorial using the NYX Butt "Naked" Palette.
Here's a direct link to the video:
https://www.youtube.com/watch?v=JJ7-3p8A_pQ
Take a look at some pics of the look:
Here's a look at the palette:
M A K E U P:
Essence I Love Stage Eyeshadow Base
NYX Butt "Naked" Palette
Sedona Lace Gel Eyeliner in Black Out
Maybelline Baby Skin Instant Pore Eraser Primer
Maybelline Dream Satin Liquid Foundation in 04 Light Porcelain
Collection Lasting Perfection Concealer in 01 Fair
Rimmel London Scandal Eyes Waterproof Kohl Kajal in 005 Nude
NYX Butt "Naked" Palette
Collection Longer Lash Lengthening Mascara in Ultra Black
Maybelline Matte Maker Mattifying Powder in 10 Classic Ivory
NYX Butt "Naked"Palette
NYX Matte Lipstick in Sweet Pink
M A K E U P Before Filming:
Cien Moisturising Cream
Rimmel London Eyebrow Pencil in Hazel
W7 Brow Bar Palette
Collection Colour Lash All Day Wear Mascara in Brown
Thanks very much for stopping by!
Don't forget to like, comment and subscribe to my channel!
Cya Later!
Love,
Siobhán xo
Hello Lovlies! Welcome back to Sense Of Beauty! I apologise for being M.I.A. recently! Today's blogpost will be a showcase of two new recent purchases!
Last week, I picked up a Kindle Paperwhite!
I bought mine in Argos.
Here's the direct link:
http://www.argos.ie/KINDLE
It is €20 cheaper in the new Spring/Summer Argos Catalogue though!
I am obsessed with the Kindle! The battery life is amazing on it! It's super light weight and easy to carry with you! I find it difficult to put the bloody thing down haha! I have just finished reading 'Gone Girl'. I will post a review of the book soon!
If anyone is undecided as to whether or not you should buy one, I definitely recommend one!
Celine bags have become an extremely popular bag worldwide but the price tag is horribly steep! Many stores have now tried their own "spin" of the highly coveted bag. After some searching on the interwb, I found this beauty on eBay!
Here's a direct link to the bag:
http://www.ebay.ie/BAG
The bag cost around €27 and I bought the Nude/Beige colour.
Here's a look at the packaging:
Here's a look at the bag:
The bag is very spacious and can hold a lot of items! Here's a look at what I fit into my bag!
Here's a picture of the bag when I'm holding it. This pic might give you a better look at the size of the bag.
I love the bag! The size and colour is perfect! I can fit everything I need in the bag. The colour is perfect to pair with all outfits. The quality is excellent and the material of the bag feels very luxurious. The bag has 2 straps that can be worn in the crook of your arm and also a longer strap to wear on your shoulder. Inside the bag there are 2 zip pockets and 3 small pockets.
I have been obsessing over these 2 recent purchases lately! Both are definitely worth the money!
Thank you very much for stopping by!
See you in my next blogpost!
Love,
Siobhán xo
Hello Lovlies! Welcome back to Sense Of Beauty! Today's blogpost will be a two-parter! First part will be a Geometric Nail Art Tutorial and the Second Part will be a look into what I purchased in Boots recently!
Let's get started with the Geometric Nail Art Tutorial!
What you'll need:
-Nail Polish Remover (Mine is from the €2 shop)
-Cotton Wool Pads (Lidl)
-Nail Clippers
-Nail File
-Base Colour (Nude)
-Darker Colour (Maroon)
-Top Coat
-Sellotape
-Cotton Buds (Lidl)
Step One is pretty straight forward. Using a Cotton Wool Pad and Nail Polish Remover, remove your nail polish. The Nail Polish Remover I am using was €1.50. It was purchased in the €2 Shop. The Cotton Wool Pads were bought in Lidl. They're super cheap and cheerful!
Step Two involves you using a Nail Cutter/Trimmer and trimming your nails. If you don't want to trim any length off your nails, you can skip this step.
Step Three involves you filing your finger nails with a nail file. Filing your nails will buff the edges of your nails and make them smooth and evenly-shaped.
Apply your base coat in Step Four. Use a colour that is lighter than your darker shade. Apply one even coat on all of your finger nails. If the nail polish isn't opaque, apply a second coat.
Here's some information on the base nail polish I bought. I purchased this in PoundLand Enniskillen for ONL £1!! I only used one coat of this nail polish and the pigmentation of the nail polish is excellent!
Here's a closer look at the base nail polish! I LOVE IT!
To create the Geometric design, I used sellotape. To prepare the sellotape, I cut an inch sized section and apply it to the back of my hand. I apply it to the back of my hand and remove it a few times, this is to remove the tackiness from the sellotape.
Place the sellotape at the bottom of your nail with the corner pointing up. On my ring finger, I placed the sellotape on the opposite side of your nail, on the tip. Ensure you applied the sellotape tight to your nails. Make sure your base coat is fully dry before you apply your sellotape.
Apply a darker shade to your nail. You can apply this colour messy because the sellotape will ensure it is neat and tidy.
I used a maroon shade of nail polish by Nails Inc. London. The shade is in Victoria. I did have to apply 2 shades of this nail polish to ensure it was fully opaque.
Remove the sellotape. Make sure your darker nail polish is fully dry before you remove the sellotape.
Apply a Top Coat to your nails. I used NYC Expert Last Nail Polish in 138 Classy-Glassy.
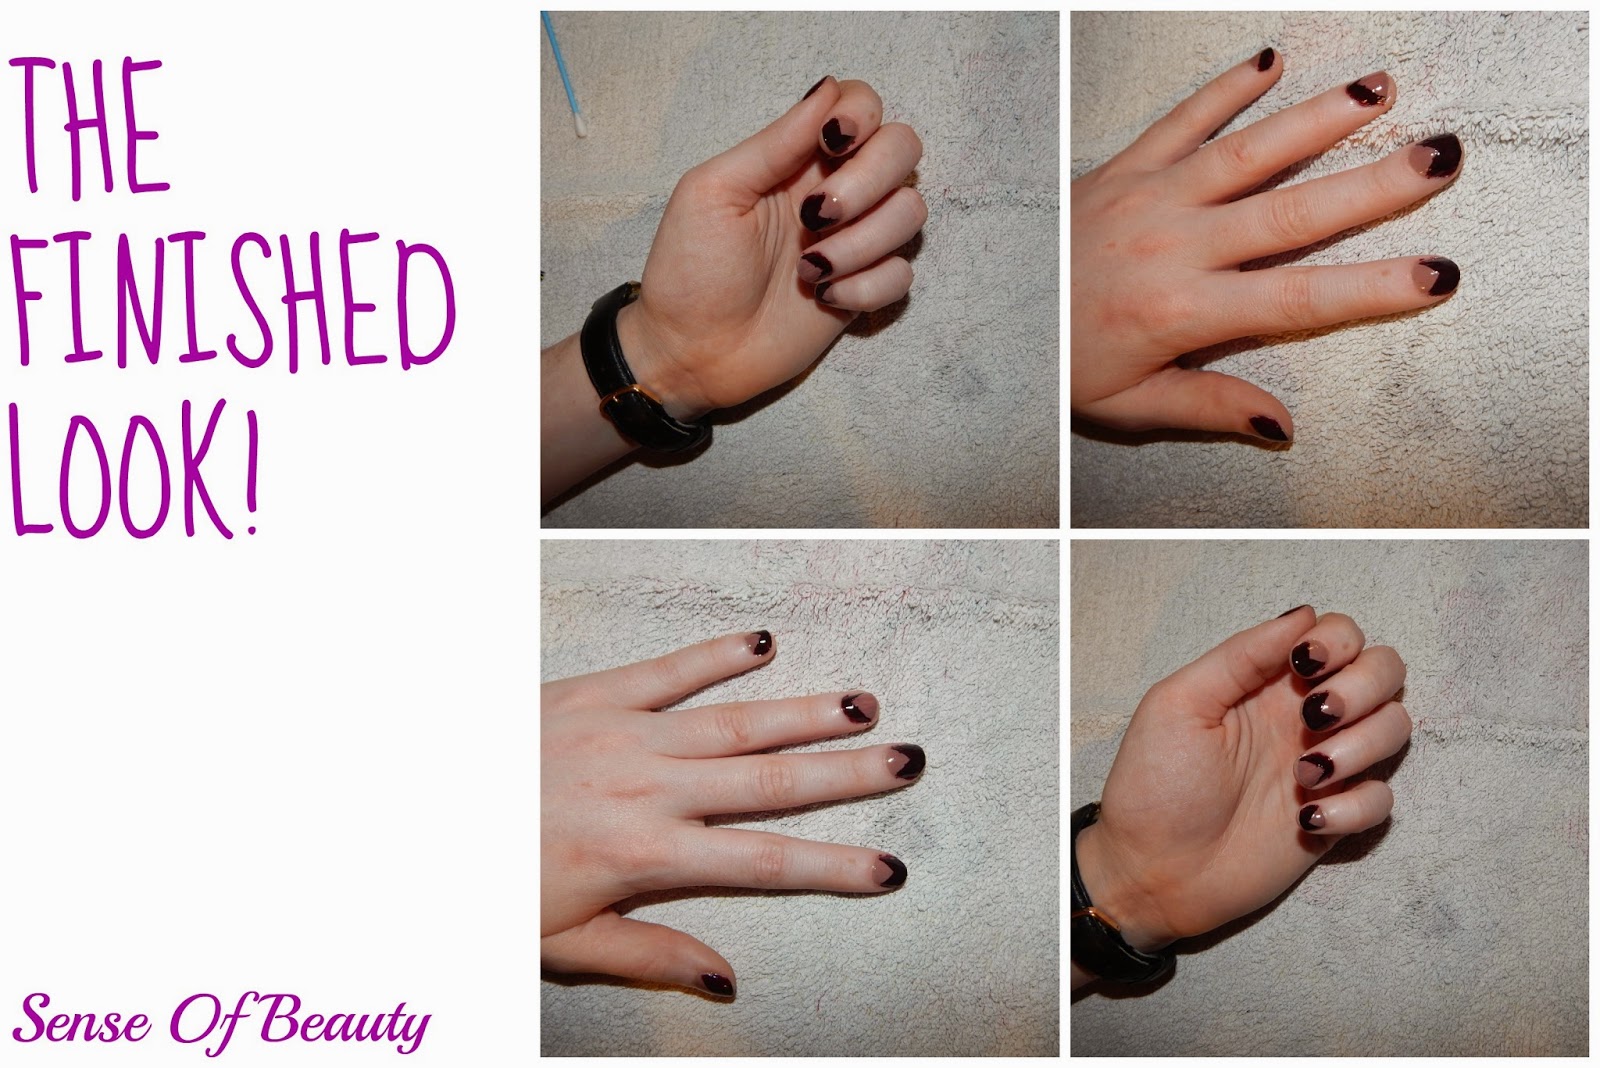
Using a cotton bud and nail polish remover, clean the edges of your nails.
Boots Haul Time!!
I hope you've enjoyed this post!
Of course, the colours used in the nail tutorial can be changed to your desired colours!
Thanks for stopping by!
Much Love,
Siobhán xo